A Beginner’s Guide to Moongate DIY Unleashing Your Creativity
Introduction
Embarking on the journey of crafting your own moongate might seem like a daunting task for beginners. However, fear not! In this comprehensive guide, we’ll walk you through the process of creating a stunning moongate, adding a touch of elegance to your space. Whether you’re a seasoned DIY enthusiast or just getting started, our step-by-step instructions will empower you to unleash your creativity. Moongate DIY
Understanding the Essence of a Moongate
What is a Moongate?
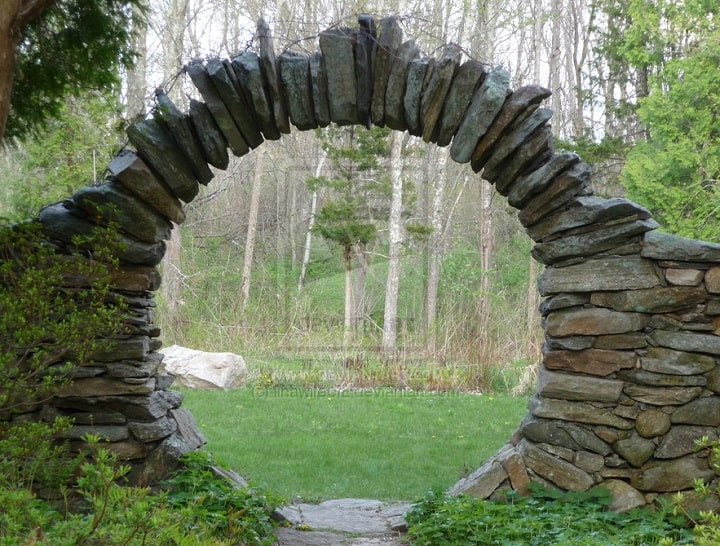
A moongate is not just a decorative arch; it’s a symbol of harmony and unity. Originating from Chinese garden design, moongates have transcended cultural boundaries, becoming a popular choice for weddings, events, and home decor. Crafting your own moongate allows you to infuse personal flair and intention into this timeless piece.
Materials Needed
To kickstart your moongate DIY project, gather the following materials:
Circular Frame: Opt for sturdy materials like PVC or metal for durability.
Flexible Willow Branches: Ideal for creating the arch’s curvature.
Twine or Wire: Essential for securing branches to the frame.
Floral Decorations: Choose flowers or greenery that resonate with your style.
Pruning Shears: To trim branches and ensure a neat finish.
Wood Glue or Zip Ties: For additional support and stability.
Step-by-Step Guide
Frame Preparation
Begin by assembling your circular frame. Ensure it’s secure and can withstand outdoor conditions if you plan to place the moongate in your garden. This foundational step lays the groundwork for a stable and visually appealing structure.
Willow Branch Placement
Gently weave the flexible willow branches through the frame, creating the arch’s signature curvature. This step requires patience and precision, so take your time to achieve the desired shape. Experiment with different arrangements to find the perfect balance.
Securing the Structure
Use twine or wire to secure the willow branches to the frame. This not only enhances stability but also adds an extra layer of visual interest. Be mindful of maintaining the circular shape, and adjust as needed to achieve symmetry.
Personalization with Florals
Now comes the fun part – decorating your moongate with florals! Select flowers that complement your style and the intended use of the moongate. Secure them to the frame, allowing your creativity to shine through.
Maintenance Tips
Longevity and Care
To ensure your moongate stands the test of time, consider these maintenance tips:
Weather Protection: If placed outdoors, treat the moongate with a weather-resistant sealant.
Seasonal Changes: Switch out florals based on the season for a fresh and dynamic look.
Regular Checks: Periodically inspect the structure for any signs of wear or damage.
Conclusion
Congratulations! You’ve successfully created a captivating moongate that adds a touch of magic to your surroundings. This beginner’s guide has equipped you with the knowledge to embark on future DIY projects confidently.